This Project Is COMPLETE
Below you’ll find final upholstery workshop photos and instruction photos that show how to install your Cockpit mounting(s) to your motorcycle(s).
If you have any questions about installation, K9 rider training, safety equipment, or anything else related to your K9 Moto Cockpit riding adventures together, don’t hesitate to reach out to us!
A Note About Packaging
We carefully package each K9 Moto Cockpit individually to protect the fine craftsman upholstery. But we don't believe in creating branded packaging that you pay for and is usually not recyclable.
Instead, we reuse discarded cardboard and other used packaging materials. Your Cockpit package won't look glamorous but it saves money, reduces waste, and the real treasure waits for you inside.
NOTE: The Baseplate for your Cockpit is packaged separately in cardboard sheets so be sure to look for it inside the box!
Your Cockpit Upholstery Photos
Below are the final workshop photos of your Cockpit frame for your reference.


Custom Mounting Instructions
The following information is provided in greater detail in the K9 Moto Cockpit Installation Guide here.
We recommend that you mount the baseplate to your motorcycle first to avoid unnecessary manipulation of the upholstery.
For Custom Mounting Cockpits, we provide a Mounting Portrait and Assembly Photo Instructions to guide you in the installation.
The Mounting Portrait shows what the baseplate and mounting hardware should look like when correctly assembled.
The Assembly Photo Instructions show where each bracket, bolt, U-bolt, etc. secures to your Cockpit baseplate. Each custom brackets and bolt hole intended for mounting is tagged with a color sticker and identified with a letter to assist you with the assembly.
MNT-1616
2024 Harley-Davidson CVO Road Glide
Mounting instruction photos will appear below when they are available.

You can review your Mounting Diagram and rewatch your instructions video by clicking the button below.
If you are having any difficulty mounting your Cockpit, please contact us.
Installing the Baseplate to Your Cockpit
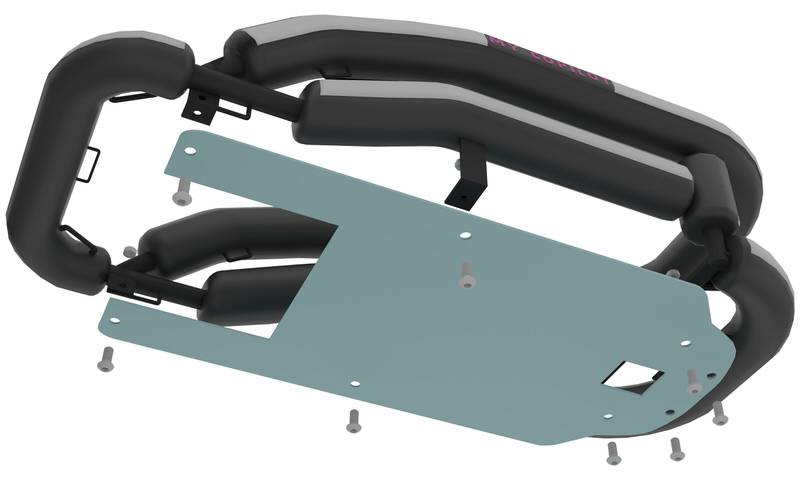
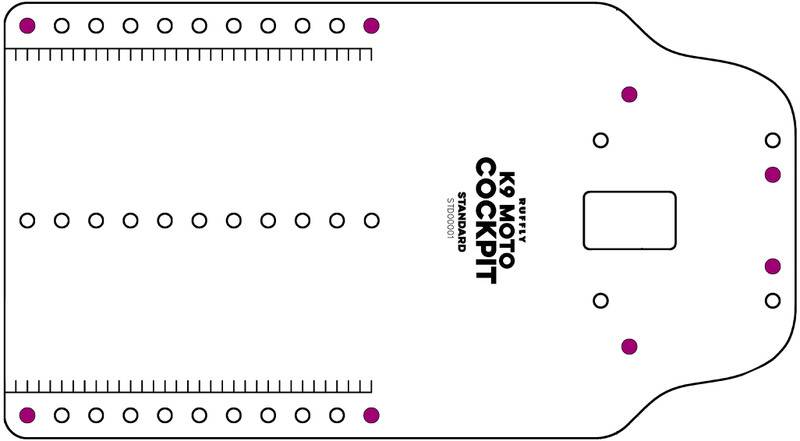
To install the baseplate to your Cockpit, line up the installation bolt holes (indicated in pink on the diagram). There are eight (8) bolt holes on all Cockpit sizes except the Nano.
Install the baseplate to your Cockpit as follows:
- Always mount the baseplate with the engraving facing upwards.
- Insert the shoulder washers into the baseplate to protect against vibration.
- Place the M6 Allen bolts from the bottom up so that the bolt head is facing down.
- The two longer bolts secure the baseplate to the crosswise bar – these are extra and optional.
- Place the washer and nut.
- Tighten the bolts little by little in a series of rounds to permit the metal hardware to adjust and settle.
Help Us to Improve and Spread the Word
If you have successfully mounted your Cockpit and completed your first ride with your K9 copilot, please consider sharing your experience.
Your feedback is how we improve the Cockpit and our processes. It’s also how we get the word out to help others share the thrill of the ride together!
Please Share Your Feedback Using the Form Below
"*" indicates required fields